Creating an Event
This article contains a comprehensive guide on how to create an Event in EventRaptor. For your convenience, it is split into several sections and subsections so that you can easily find what you are looking for.
If you feel anything is missing or incorrect, please email support@eventraptor.com so we can assist you and update this guide if needed.
Introduction
This guide does not contain information on creating an EventRaptor account or creating your user profile. You need to have created an EventRaptor account in order to create an Event on the platform.
Types of Events
There are currently 2 types of Events you can create on EventRaptor; Meetings and Summits.
Meetings
In EventRaptor, a Meeting is the most basic Event type. It’s an Event up to a few hours long featuring a single stream of content without additional speakers or contributors.
All paid plans can host unlimited Meetings without worrying about plan limits or overlapping registration periods.
Some real-world examples of Meetings include: weekly office hours for your clients; a live demo of your product; group training or coaching sessions; or anything else you can think of - you're in charge!
Summits
A Summit is an Event predominantly characterized by a focus on guest speakers. While in other types of Events you may have a guest speaker come in to supplement the content, with a Summit the guest speakers are the content.
In EventRaptor, creating a Summit unlocks powerful speaker management functionality that Meetings don’t have, so we’ve marked where information here is specific to Summits or all Event types.
Summits are available on the Growth and Power plans, as well as for Agency customers. Click here to see all plans.
Note: we recommend only choosing the Summit type if you are hosting a summit, as some features presume you have guest speakers, such as your registration page, directory entry, and more.
Creating an Event
Create an Event / Meeting / Summit buttons
There are several ways to create an Event in EventRaptor.
From the Events tab
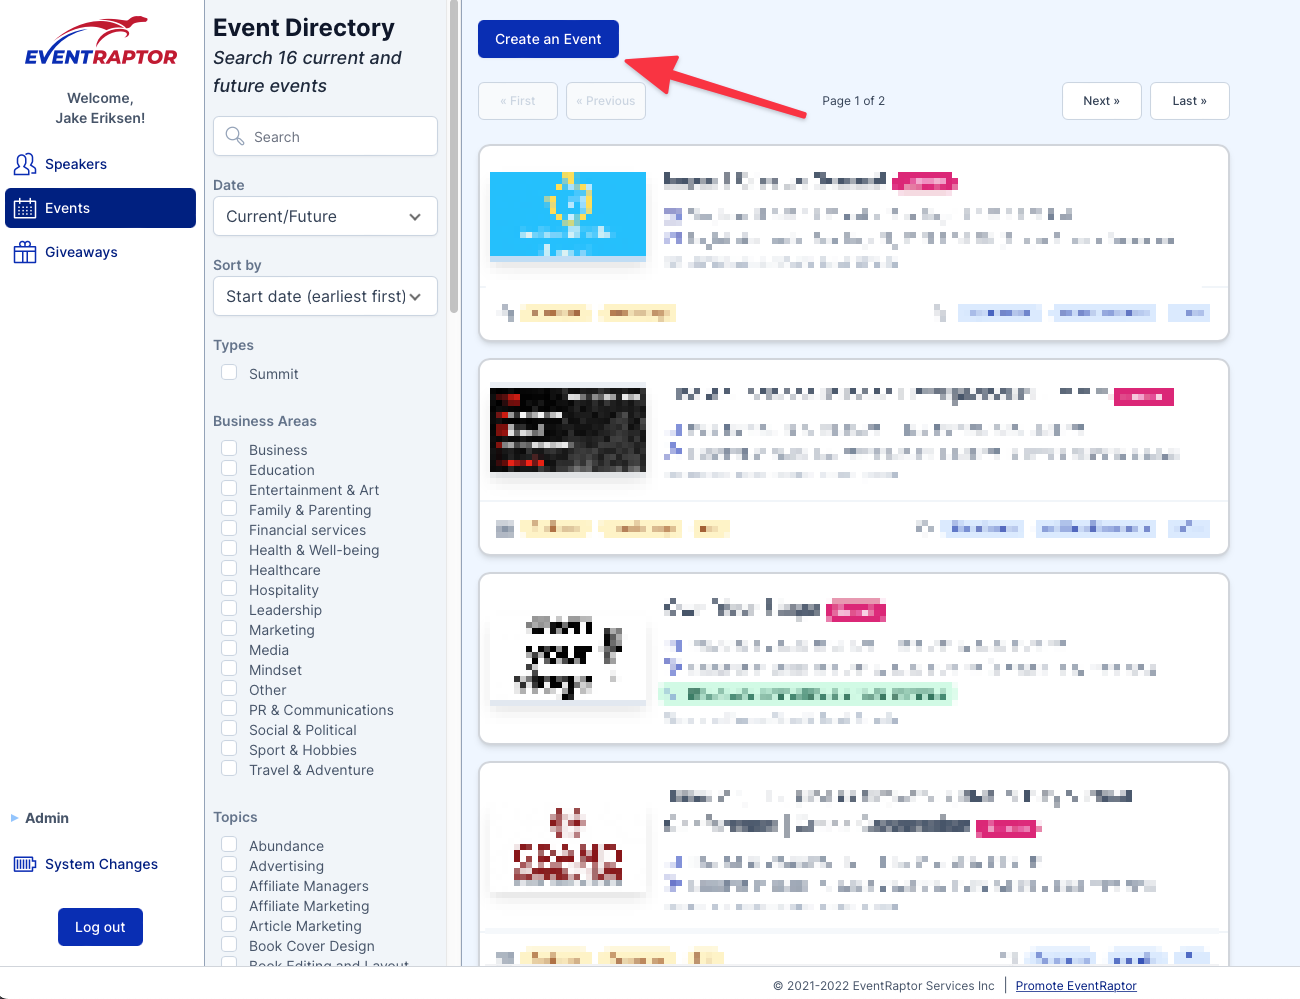
Navigate to the Events tab on the left of the screen, and click the button that says Create an Event at the top of the screen, in the right section.
From the Welcome screen

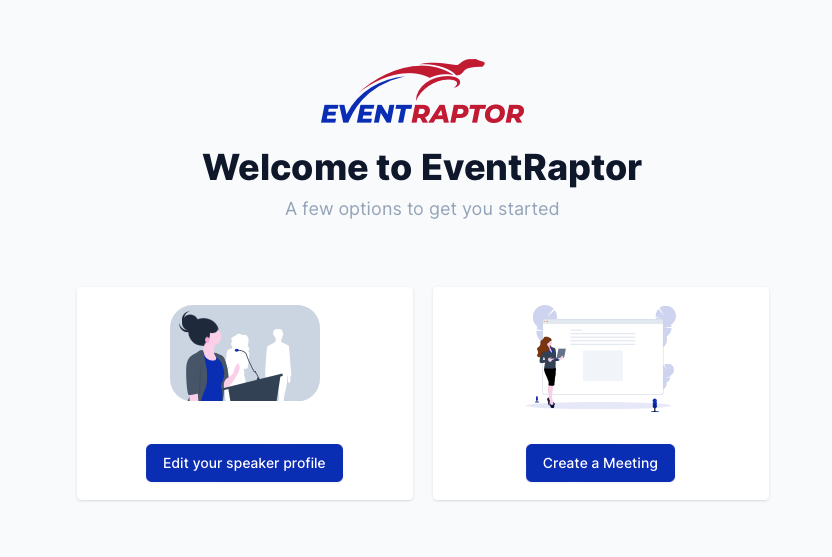
Depending on how much you’ve used your EventRaptor account, you may see a “Start Here” section in the sidebar. Click “Start Here”, and then you’ll come to the Welcome screen where you can select from a few options, including creating an Event.
From My Overview
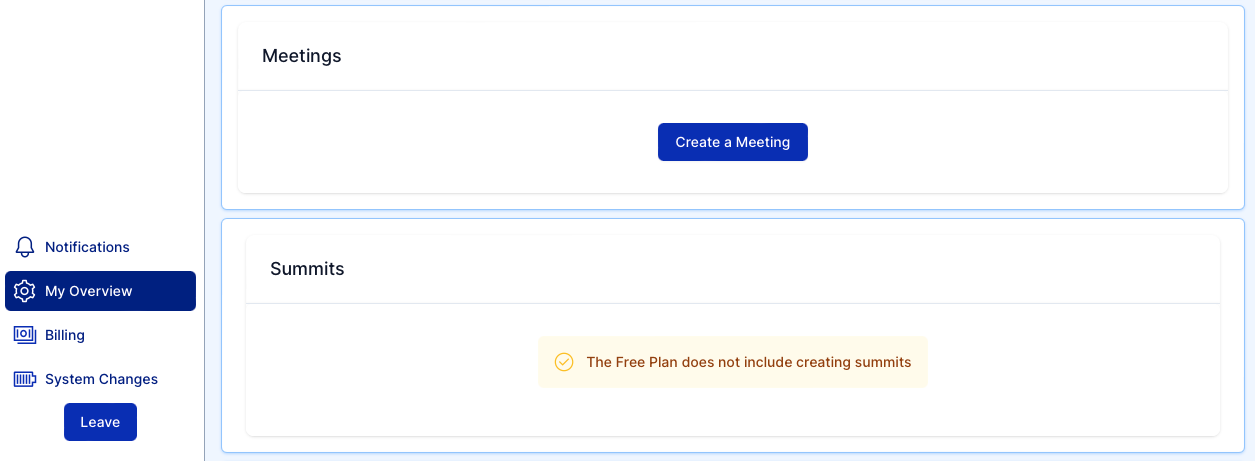
Click on “My Overview” in the bottom left of the sidebar to get to a page with profile settings, your Speaker Profile, Presentations, and your Events. From here, you’ll have options to create Events depending on your membership plan and existing Events you’ve created.
Choosing an Event type
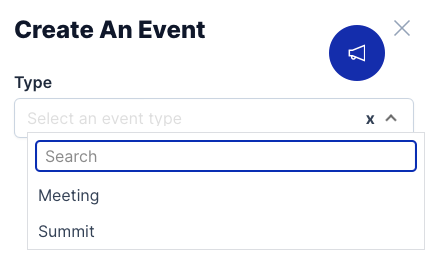
Once you click the button to create your Event, a menu will slide out from the right.
Setting basic details
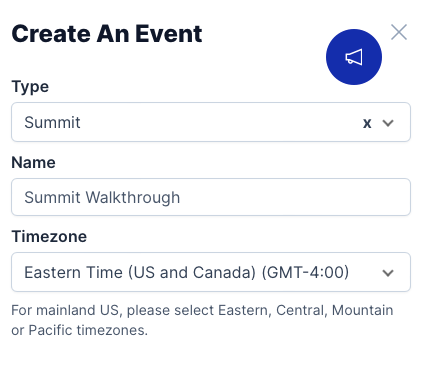
Once you’ve set your meeting type, you’ll also enter a Name and Timezone for your Event. Don’t worry - you can change these later, but these let us get started setting up your Event.
Then, hit the Create button on the bottom right of the slide-out menu.
Event Details

The Event Details section is where you edit some basic details about your Event. This page is different depending on whether you’re running a Meeting or Summit, so we’ve broken the explanation across two subsections in this guide.
You can always find this section again by clicking on “Event Details” in the sidebar, under the “Setup” menu.
Event Details for Meetings
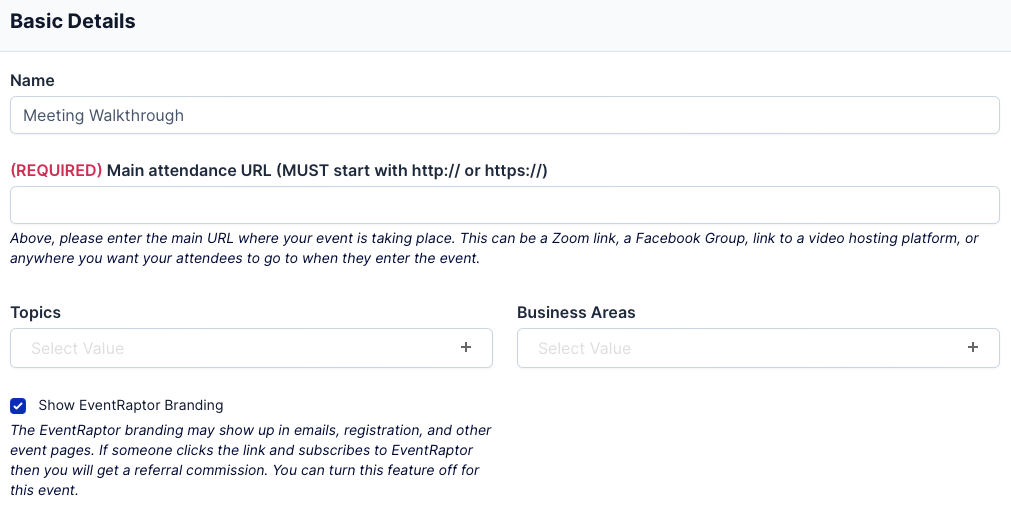
Here you have a few important fields:
Name: This is the name of your Event. It will be seen by attendees and appear in places like emails and registration pages.
Main attendance URL: This is a required field that takes the form of a URL (e.g. https://example.com)
This is the actual (virtual) location of the Event - it can be a Zoom meeting link, or anywhere you want to send your attendees for them to access your Event content.
Topics & Business Areas: Here you can enter some metadata about your Event. This helps people find you and your Event during searches on the EventRaptor platform.
Show EventRaptor Branding: This allows you to keep or turn off EventRaptor branding, depending on whether your membership plan allows it.
By turning this off, EventRaptor branding will not appear in emails, on registration pages, or on other Event pages. Registrants may still receive emails from an EventRaptor email address depending on the email configuration.
By keeping this on, EventRaptor branding may appear throughout your Event. We’ve designed this branding to be subtle and non-obtrusive, to not distract from you and your brand - however you can turn this off at any time. If someone engages with EventRaptor branding and later purchases an EventRaptor plan, you will receive referral commission. For more details, see our affiliate page.
Event Details for Summits
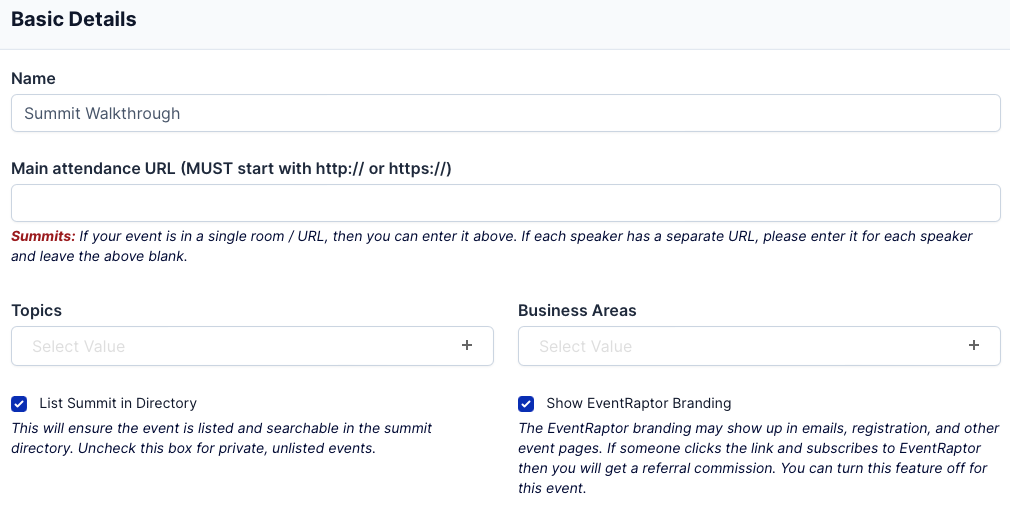
The first few details are mostly the same for Summits as they are for Meetings, with an important change to the attendance URL and the addition of the directory listing.
Name: This is the name of your Event. It will be seen by attendees and appear in places like emails and registration pages.
Main attendance URL: This is a field that takes the form of a URL (e.g. https://example.com)
This is the actual (virtual) location of the Event - it can be a Zoom meeting link, or anywhere you want to send your attendees for them to access your Event content.
If your summit uses a single room / URL, enter the link in this section.
If your summit uses a multi-room setup (e.g. multi-track, or if each speaker has their own URL), enter the link for each speaker individually and leave this section blank.
Topics & Business Areas: Here you can enter some metadata about your Event. This helps people find you and your Event during searches on the EventRaptor platform.
List Summit in Directory: This allows you to list your Summit in the EventRaptor Events Directory, allowing others to search and view your Event. From here, they can apply to speak at your Summit or get in contact with you regarding your Event. Leave this unchecked for private Events.
Show EventRaptor Branding: This allows you to keep or turn off EventRaptor branding, depending on whether your membership plan allows it.
By turning this off, EventRaptor branding will not appear in emails, on registration pages, or on other Event pages. Registrants may still receive emails from an EventRaptor email address depending on the email configuration.
By keeping this on, EventRaptor branding may appear throughout your Event. We’ve designed this branding to be subtle and non-obtrusive, to not distract from you and your brand - however you can turn this off at any time. If someone engages with EventRaptor branding and later purchases an EventRaptor plan, you will receive referral commission. For more details, see our affiliate page.
Summits also have a few additional sections that are unique to the Event type.
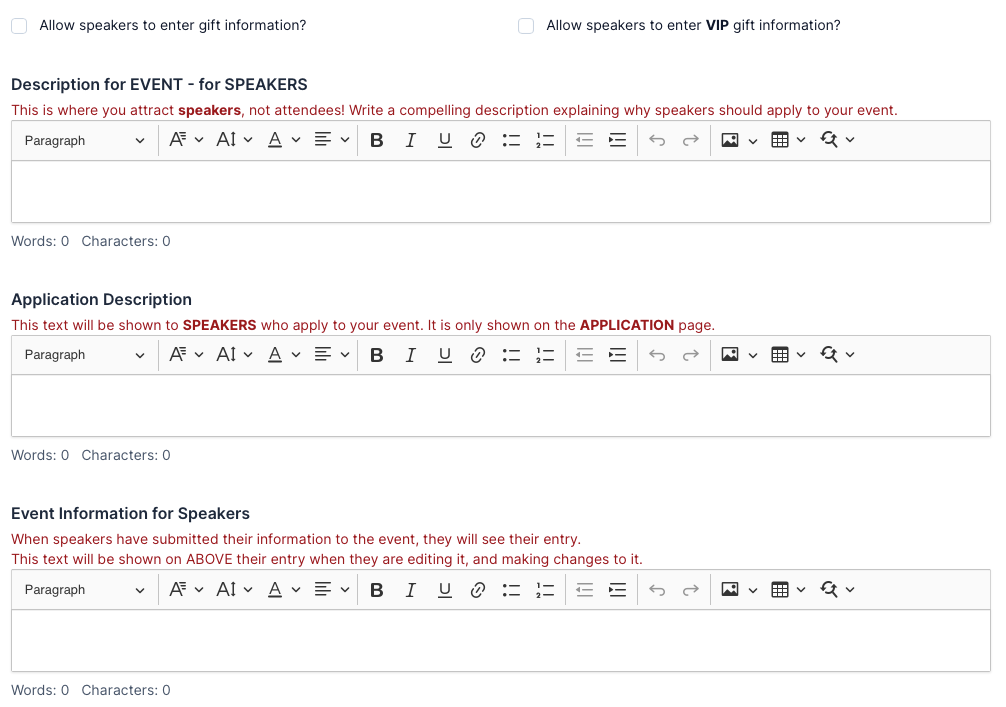
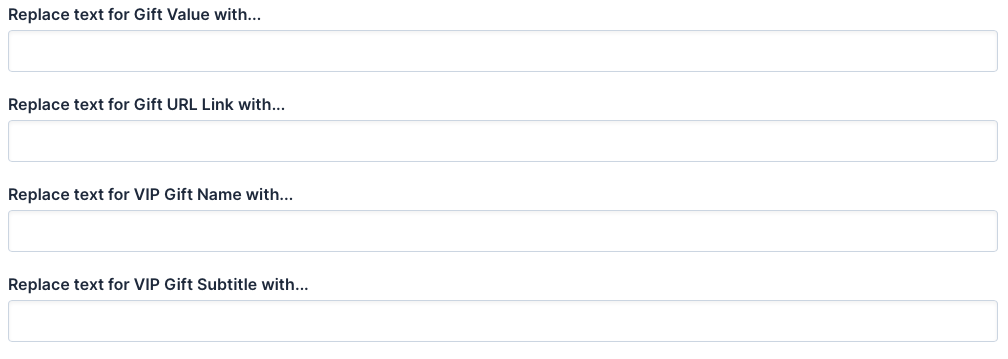
Allow speakers to enter gift information: This allows speakers to include details of their “free gift” they offer the audience during their talk and throughout the summit.
Allow speakers to enter VIP gift information: This allows speakers to include details of their “VIP” gift they offer those who purchase an upgraded / “VIP” ticket to the Event. Leave this unchecked if you are not offering bonuses from the speakers as part of your offer.
Description for Event - For Speakers: In this section, fill out some information for speakers about why they should come and speak at your Event. Text can include things like what criteria you are looking for in speakers, details about the Event and the audience, and any terms and conditions you have. If you checked List Summit in Directory earlier, you should fill out this section, as there will likely be many people viewing your Event page, so you should make sure there’s information for anyone interested in participating.
Application Descriptions: Here you can enter any information you want prospective speakers to know during their application to speak at your Summit. You can include things like reminders for what kind of information you’re looking for from speakers, required audience / list size, and more.
Event Information for Speakers: This information appears above a speaker’s application while it is pending and after it has been accepted. It’s also viewable while they are editing their application after submitting it. You can use this section to reiterate specifics about the Event or submissions, such as formatting requirements or language choices, for speakers to reference when they are editing their submission.
Event Dates
The Event Dates section is where you edit the date and time of your Event. This page is different depending on whether you’re running a Meeting or Summit, so we’ve broken the explanation across two subsections in this guide.
Event Dates for Meetings
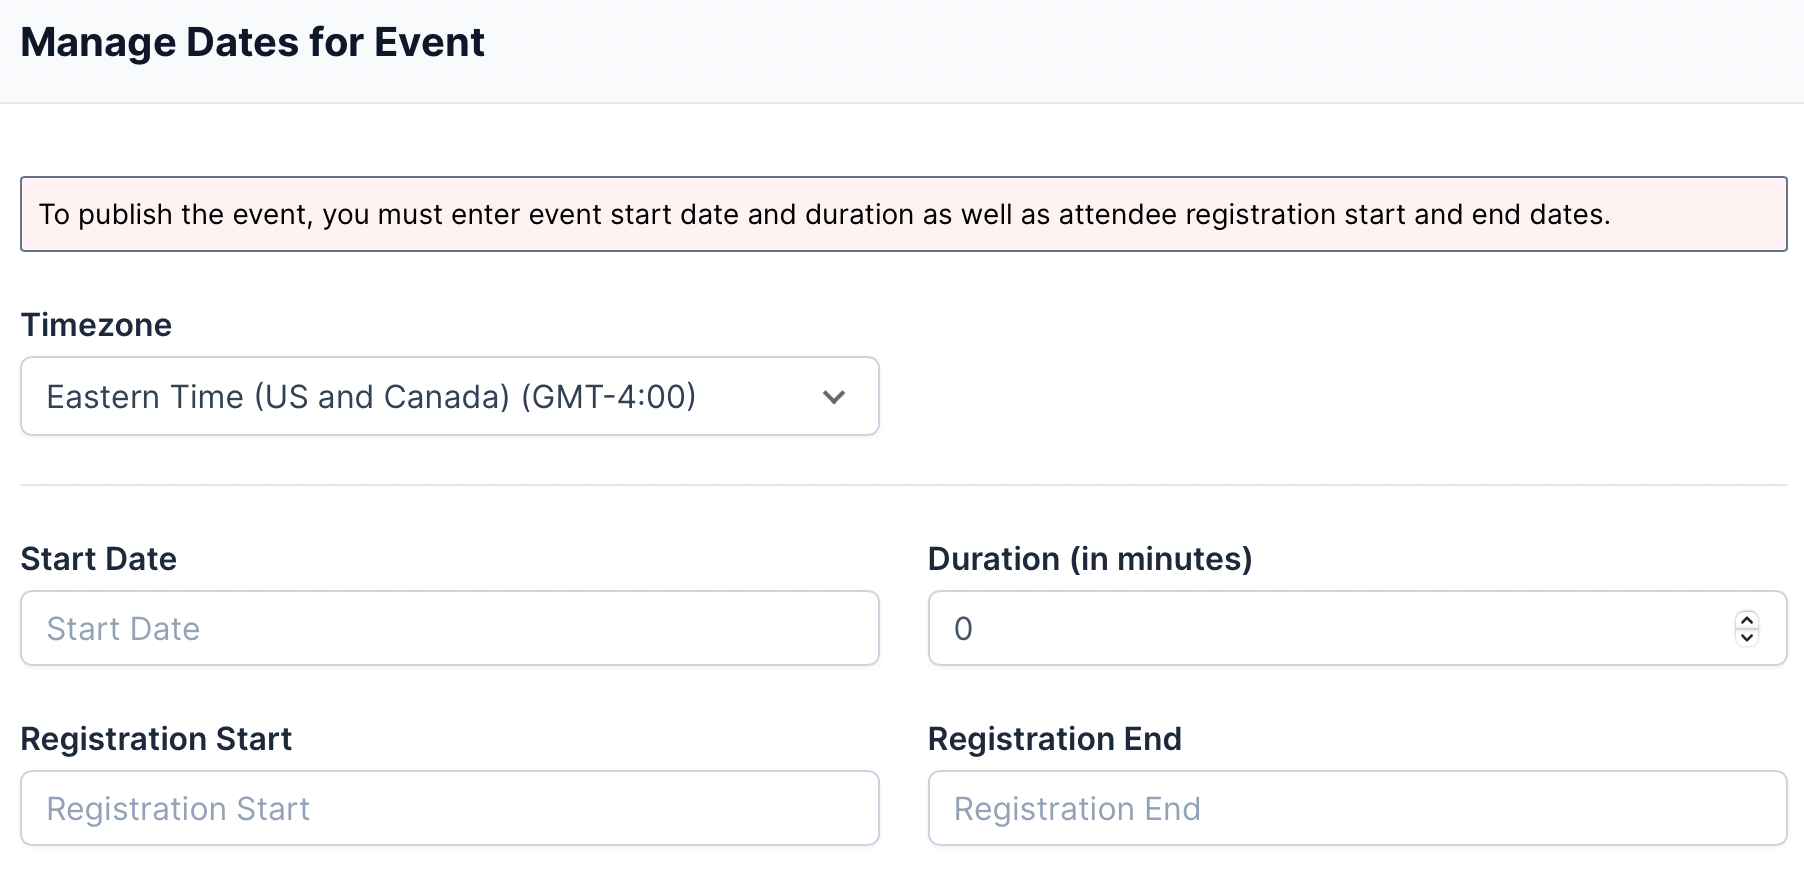
There are a few important parts around the timing of your Event - namely when does it start, how long does it last, and when can people start registering for it?
Timezone:What timezone is the Event scheduled in? This will be the primary timezone displayed on schedule pages and in emails about the Event, so we’d recommend choosing either your own timezone, or the timezone you expect the majority of your audience to be in.
Start Date (& Time): Here you set when your Event actually begins. This is the time you want your audience to log into the Meeting - at this date and time, the Meeting link will go “live” and registrants will have access to the link, so make sure you’re ready!
Duration: This is how long we display the Event as lasting in the Event Information - don’t worry, you can cut the Event short, and there’s no penalty if you run over. On the free (Lite) plan, you can host Meetings up to 2 hours, up to 4 hours on the Starter plan, and unlimited duration on the Growth and Power plans.
Registration Start & End: This is when people can start registering to attend your Event, and when registration closes. Once the Registration End point is reached, new leads won’t be able to register for your Event, so we recommend setting this for when the Event starts, or even shortly after that if you’re OK with taking latecomers.
Event Dates for Summits

Event Dates for Summits are similar to Meetings, with a slightly different format and additional fields.
Timezone: What timezone is the Event scheduled in? This will be the primary timezone displayed on schedule pages and in emails about the Event, so we’d recommend choosing either your own timezone, or the timezone you expect the majority of your audience to be in.
Start Date (& Time): Here you set when your Event actually begins. This is the time you want your audience to log into the Summit - at this date and time, the Summit link will go “live” and registrants will have access to the link, so make sure you’re ready! For a live Summit, we recommend setting the Start Date as the time and date of the first session for the Summit. If the Summit is pre-recorded, consider setting the Start Date at midnight on the first day to allow for 24 hours of access.
End Date: Instead of Duration, with Summits you can choose an End Date. This is because Summits can typically span multiple days and all accounts that support Summits can run them for an unlimited duration. So instead of trying to calculate the length of your Summit in minutes, you can just enter when it ends. For a live Summit, this should be the expected end of the last session of your Event. For a pre-recorded Summit, we recommend setting the end time to 11:59PM on the last day, to allow for the full 24 hours of access to the pre-recorded videos.
Registration Start & End: This is when people can start registering to attend your Event, and when registration closes. Once the Registration End point is reached, new leads won’t be able to register for your Event. For multi-day Summits, it’s very likely that some people will be registering after the first day, so we recommend setting this towards the end of the Event - or even later, if your sales funnel is set up to sell the Summit recordings.
Start Accepting Speaker Applications From & Accept Speaker Applications Until: This is the time period that speakers can apply to speak at the Summit. There are lots of different ways you can manage your speaker applications, depending on the format and style of the Summit (e.g. live vs. pre-recorded) as well as the duration, so we recommend to set the first date to when you are ready to start receiving applications, and the end date to the deadline for when speakers can apply before you’d no longer consider late submissions.
Media
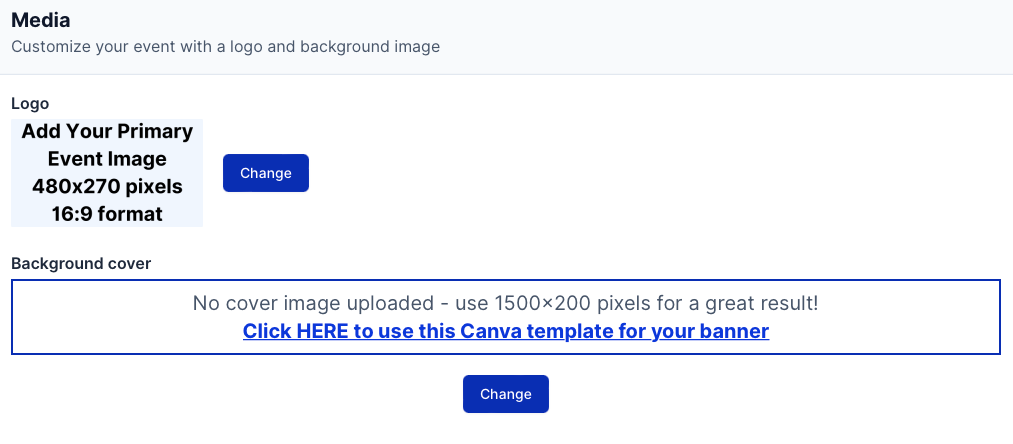
On the Media page, you can add a Logo for your Event, which will appear in the Events Directory (if applicable), as well as on the registration page. For best results, we recommend creating a new image that’s specific to your Event, including the name of the Event and the date(s), so people can easily see key information at a glance. Once your image is uploaded, take a look and make sure all the text is legible - you may need to increase font size.
Your Logo should be in a 16:9 aspect ratio such as 1280x720 and 1920x1080.
You can also add a Cover Image, which will appear at the top of your Event’s Directory Entry (if applicable), as well as on the registration page. Similar to the Logo, we recommend creating a new image that contains key information about your Event.
Your Cover Image should be in a 15:2 aspect ratio such as 1500x200.
We’ve provided a link to a template in Canva which you can use to create your Cover Image.
Registration Page
In this section you can make changes to the automatically-generated Event registration page, where people sign up for your Event.
Note: This section is a work in progress, with new features and changes continuously added. While we will try to make this guide as up-to-date as possible, please email support@eventraptor.com if there’s anything missing or outdated.
Registration Page
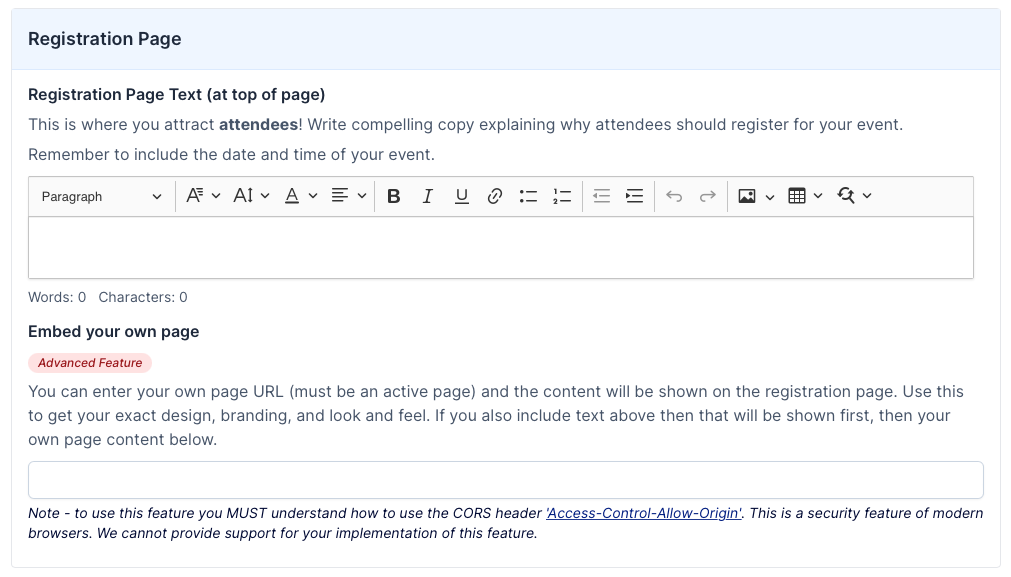
Registration Page Text
Back in the Event Details for Summits section, we discussed including text to attract Speakers to apply to speak at your Summit.
In this section, you can add text about your Event to encourage people to register to attend your Event. This is where you can include marketing copy explaining why people should register and what kind of benefits they can expect to receive by attending.
You can use the text box to format your text directly, or create it in another source like Google Docs and copy it in directly.
This is optional, but highly recommended to increase registrations for your Event.
Embed your own page
Note: this is an advanced feature. We have included it for certain users that have specifically requested early access, and are comfortable using the required tech to set things up correctly.
To use this feature, you must be familiar with the CORS header ‘Access-Control-Allow-Origin’, and understand that we do not currently provide support for your implementation of this feature.
In this section, you can enter your own page URL to embed the content from EventRaptor onto your registration page. This will include the text entered above in the Registration Page Text field, shown before the other content on your page.
Page Setup
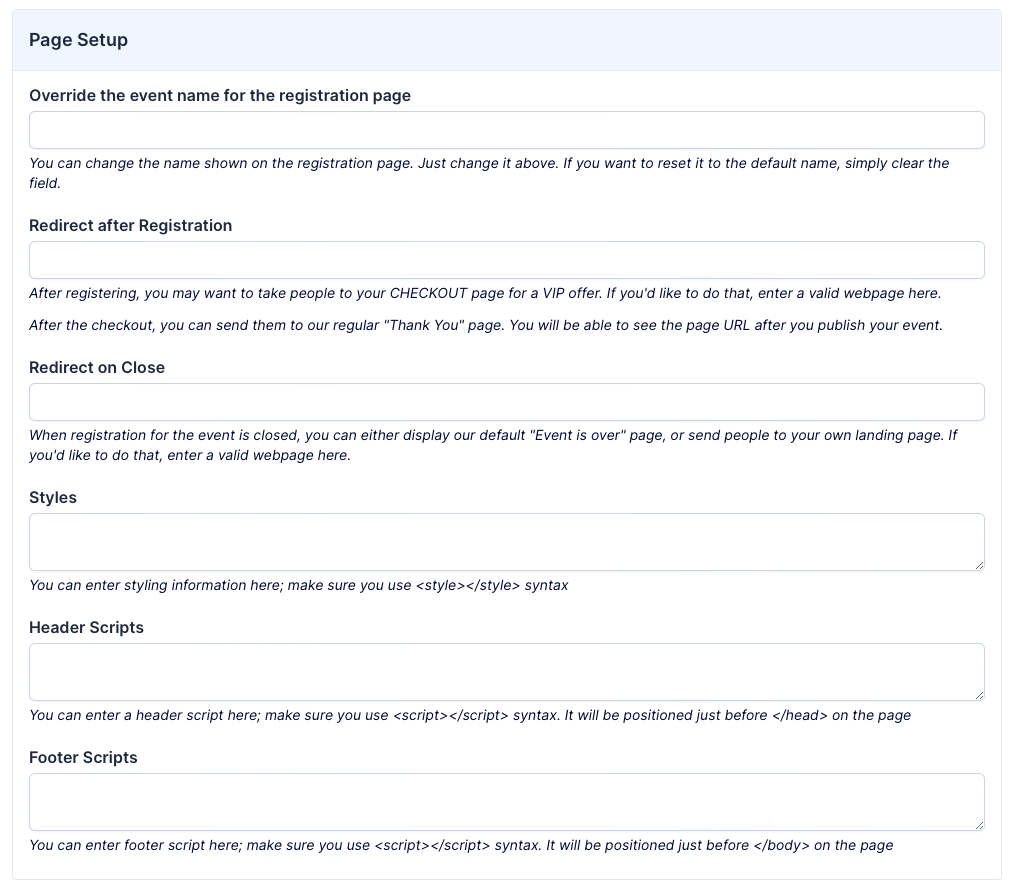
The Page Setup section contains several different ways to modify the registration page behavior, such as custom redirects and scripts. These are all optional, and are not needed to set up your Event.
Note: Styles and Scripts are advanced features. We have included them for certain users that have specifically requested early access, and are comfortable using the required tech to set things up correctly.
To use these features, you must be comfortable with <style> and <script> code, either by writing it yourself or copying from another source. We cannot provide recommendations for what to enter at this stage.
SEO Setup
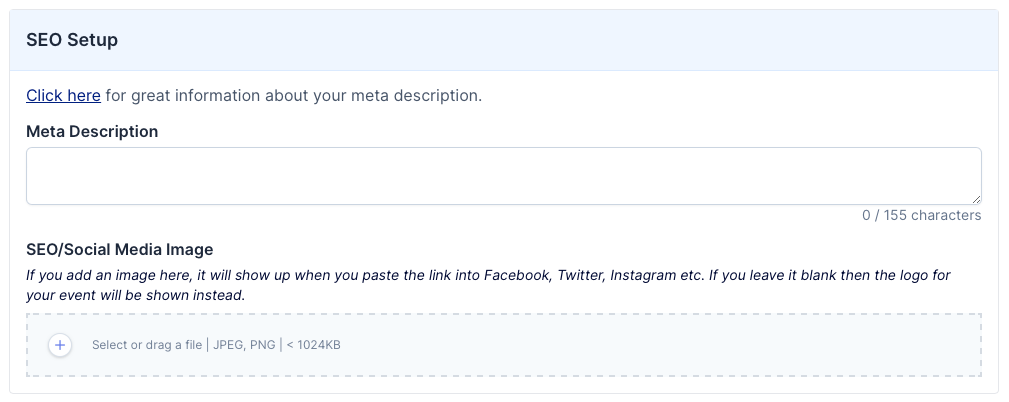
In this section you can add an SEO Meta Description, as well as an SEO image that appears in social media previews for your Event link.
These are optional - we’ll use your Event logo and text for your SEO links otherwise.
Handling of Attendee Registrations

In this section, you can add Webhook details if you’re using a platform like Zapier to take registration information from EventRaptor and add it to another system.
Note: this is an advanced feature. We have included it for certain users that have specifically requested early access, and are comfortable using the required tech to set things up correctly.
To use this feature, you must be familiar with Webhooks, and understand that we do not currently provide support for your implementation of this feature.
Event Dashboard
The Event Dashboard is what Event attendees see when trying to access your Event. Rather than going directly into the virtual meeting, they come to the Event Dashboard, which has a link to join the virtual room, as well as other important information they need to know.
In this section, you can customize the text that goes onto that Dashboard page.
Note: each of these sub-sections allow you to embed your own page content, which is an advanced feature. We have included it for certain users that have specifically requested early access, and are comfortable using the required tech to set things up correctly.
To use this feature, you must be familiar with the CORS header ‘Access-Control-Allow-Origin’, and understand that we do not currently provide support for your implementation of this feature.
During the Event
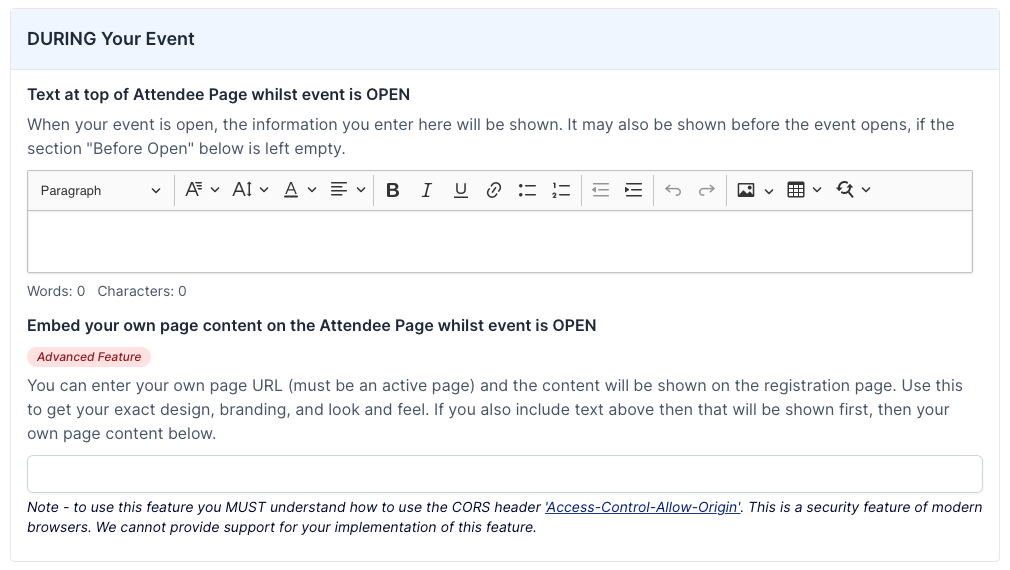
Here you can enter any text that you want to be shown while the Event is in progress. The page will automatically update to show the content at the exact date and time you have set as the start of your Event.
Anything entered here will also show before the Event, unless you enter text in “Before the Event” below.
Before the Event
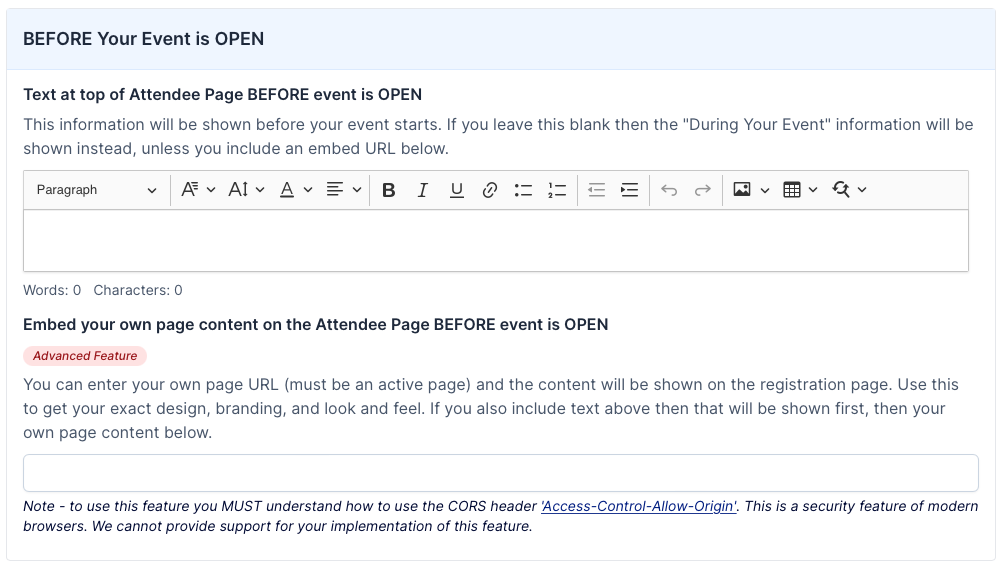
Here you can enter any text that you want to be shown before the Event. The page will automatically update to the content entered under “During the Event” at the exact date and time you have set as the start of your Event.
If this is left blank, the content in “During the Event” will be shown.
After the Event
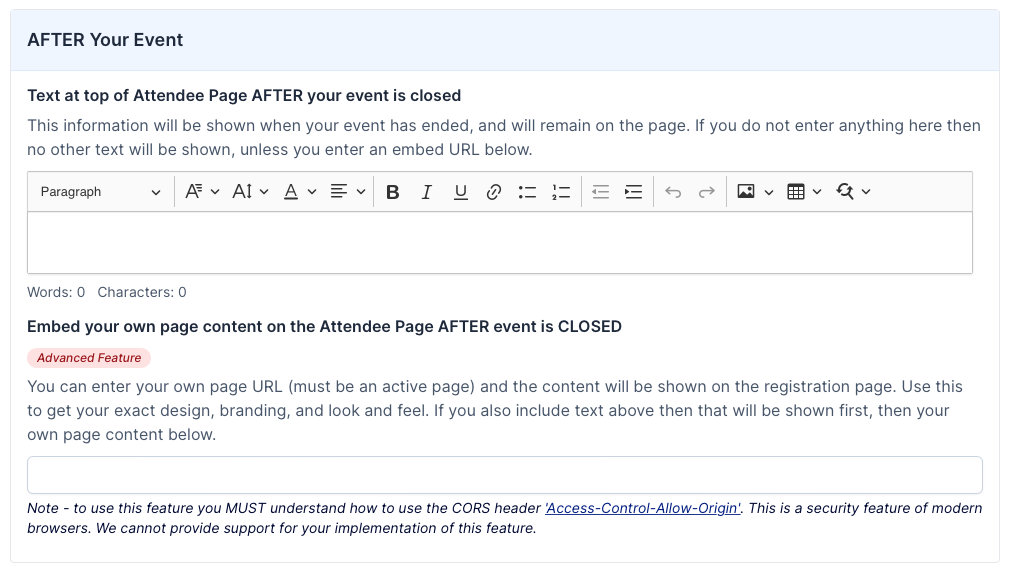
Here you can enter any text that you want to be shown after the Event. The page will automatically update to this content at the exact date and time you have set as the end of your Event, or calculated as the start time plus the Event duration.
Application Setup (Summits)
Note: This section is a work in progress, with new features and changes continuously added. While we will try to make this guide as up-to-date as possible, please email support@eventraptor.com if there’s anything missing or outdated.
The Application Setup page allows you to quickly modify the information collected from prospective speakers during their application to speak at your Summit.

By default, each of these fields are included in the application. You can check any of these boxes to turn off collecting the information.
As this page is currently a work in progress, we’d recommend disabling any fields you’re not familiar with - only leave these all on if you are an advanced user that is familiar with the process of running Summits.

On this page you can set character and word limits for different parts of the speakers’ applications.
You can also change the labels on certain fields and rename them according to your own preferences.
Dashboard
Publishing an Event
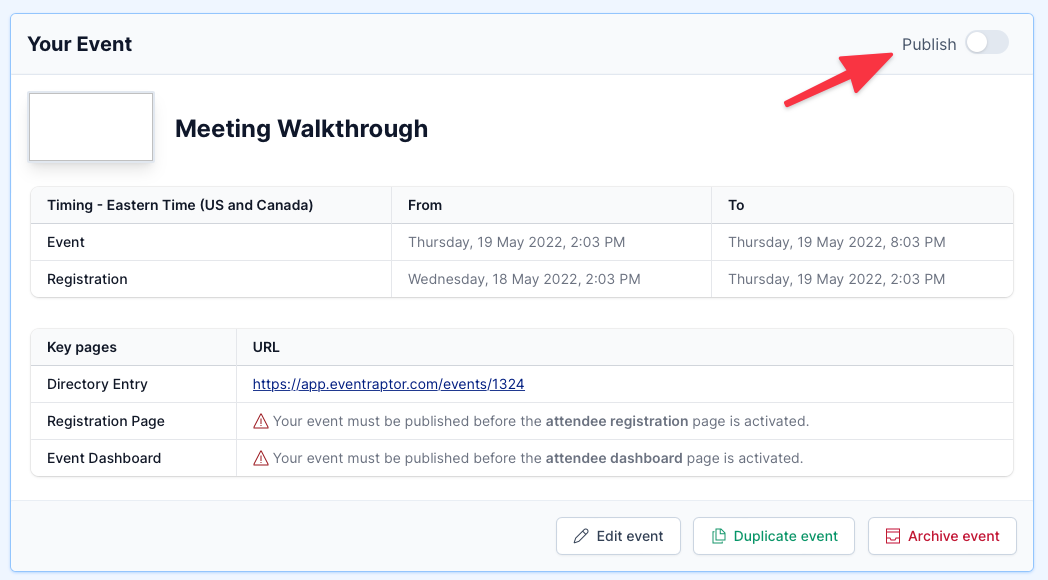
Once you’ve got your Event set up, the final step is to hit Publish, shown by the red arrow in the image above.
This makes your Event “live” so that others can access your Event - until now, we’ve been in “draft mode” and everything has been private. You can still make changes to your Event at any time by going to any of the sections we’ve previously covered.
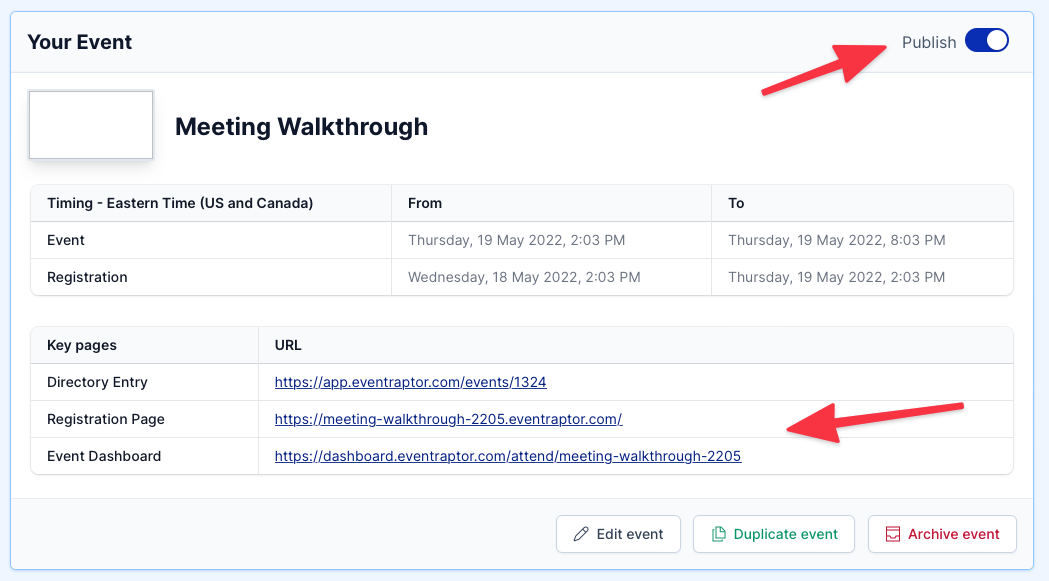
After publishing the Event, we now have links to the Registration Page and Event Dashboard, showing that we’ve correctly created the Event.

If you see the “Event is not ready to publish” error, this is likely because you haven’t entered in Event Dates and/or Registration Dates - so double check this and it should resolve your issue.
Promoters
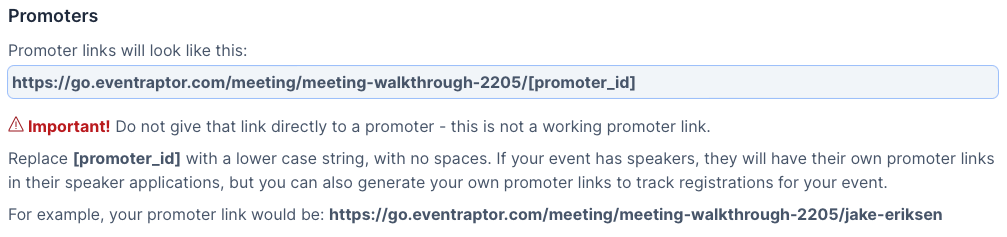
Clicking the button for “Enable promoter tracking” enables you to track what source registrations come from.
The link in the gray box is an example of what a promoter link looks like, with [promoter_id] as a placeholder.
You can swap [promoter_id] for any combination of text and numbers, and EventRaptor will note that as the source leads come from.
This allows you to do a few different things:
You can swap [promoter_id] for things like “facebook” or “linkedin” when you share links on social media or promote the Event through ads, to track performance of how many people signed up from that source.
You can take your affiliates’ Affiliate IDs from another source like ThriveCart and provide them each with their own EventRaptor link to promote your Event.
Easily add new affiliates by giving them their own [promoter_id], without having to go through an account creation process in another platform. Useful for quickly letting someone promote your Event and calculating affiliate commission later.
Emails
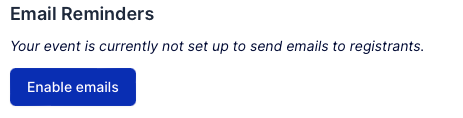
The “Enable emails” button enables email functionality for your Event. See our separate guide on emails for more information on emails.
Last updated